
Cruising in a sailboat is just an exercise in advanced problem solving. Some of the problems are simple and straight-forward, like where can we find the cheapest beer in this town? Others are more complex, such as how can we get from Point A to Point B while avoiding all the navigation hazards and storms, and dealing with winds that inevitably blow from the wrong direction?
An awful lot of this problem solving involves fixing and replacing stuff that breaks. In a previous post, we talked about the effort required to keep a cruising boat operating properly, especially an older one. We’re going to continue that theme and provide a visual tour of some of the maintenance projects and upgrades we’ve performed on Fulmar over the past 6 years, since we’ve owned her. Without further ado…
List of Projects & Improvements on S/V Fulmar (Jan 2016 - Dec 2022)
or
How Damon & Janet spend all of their time and money
(*indicates jobs that we hired others to do in whole or in part. All others were done entirely by us.)
1. Hull
Chemically strip bottom paint down to the gelcoat, repair a few minor dings and blemishes, fair, and apply epoxy barrier coat (2016)
Apply antifouling bottom paint (3 times: 2016, 2018, 2021)
Replace 9 through-hulls & seacocks (Done by two boatyards over two years, with very different levels of competence. One of the new fittings installed by the boat yard in 2018 included mild steel components that were not intended for use on a boat, and this nearly resulted in Fulmar sinking. Luckily, Janet noticed the rapidly-corroding part before it was too late.) (2016, 2018)*
Inspected keel bolts, replaced nuts & backing plates (2018)*
Fill in unused through-hulls: grind out damaged fiberglass, fill in with epoxy & fiberglass mat & woven roving (initially done poorly by a boatyard in 2018; re-done by us in 2021)
Fix damage to rudder skeg suffered in Superstorm Sandy (initially done poorly by a boatyard in 2018; re-done by us in 2021)
Fix stress cracks at bottom of rudder tube caused by Superstorm Sandy (2021)
Fix rudder gudgeon attachment on skeg (Remove gudgeon, grind out damaged fiberglass, create a mold, build up layers of fiberglass/epoxy using mold, re-drill holes for gudgeon bolts (2021)
Ground out and filled the keel “smile” with flexible epoxy and fairing compound (2021)
Repainted boot stripe and cove stripe (2021)
Inspect & Re-torque keel bolts (2021)
 |
| The keel, "cracking a smile," indicating that there is a tiny amount of movement going on (the horizontal line above the dark area). This is pretty common for sailboats but you really don't want to let that thing flex. The bottom half of the keel is made of about 6,000 pounds of lead bolted to the upper part of the keel. |
 |
| Using a chemical peel to remove the antifouling paint from the area that we're going to repair on the keel. |
 |
| Clearing away the damaged fiberglass to start the repair. We re-torqued the keel bolts and filled the exterior crack with flexible epoxy. Then used fairing compound and an epoxy barrier coat. There was no water intrusion in this case, and we'd like to keep it that way. |
 |
| These are the keel bolts that keep that 6,000-pound chunk of lead in place. There are about 12 in all. That's the torque wrench we used to snug the bolts properly. The drink can is there to provide scale. These bolts are massive. |


 |
| We also found some minor cracking at the base of the rudder tube This photo is after we've laid up a few layers of fiberglass cloth and epoxy. |
 |
| The same outfit that did the original repair to the skeg, also filled in a couple of unused through-hulls. We realized later that those repairs were not done very well. Their repair consisted of sticking a foam plug in the hole (that light-colored bulls-eye in the center of the circle) and smearing thickened epoxy over it on just the outside of the hull. Not the type of craftsmanship to which you'd want to trust your life. They didn't use any fiberglass mat or woven cloth and didn't even put a coat of epoxy on the interior side of the plug. So, again, we grabbed our favorite tool, the angle grinder and faired it back properly, dishing out both the inside and outside surfaces to create plenty of surface area for adhesion. We then laid up concentric circles of fiberglass mat and woven cloth with epoxy resin on both the inside and outside. |
 |
| Janet making some surgical modifications as we get ready to re-install the rudder. All repairs and bottom painting have been completed. See how nice those fiberglass repairs on the skeg look? |
 |
| With the rudder back in and the rudder shoe, or gudgeon, being coaxed back into place with the aid of a come-along fashioned out of the blocks that are normally part of our running backstay. We love using simple machines to make the work easier. |
 |
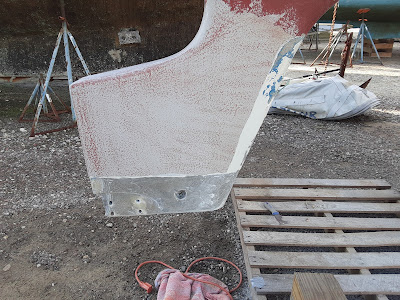
| Right after we bought Fulmar in 2015, we stripped all of the old bottom paint off. Here the paint has been stripped and we're in the process of fairing (you can see the freshly-applied pink fairing compound that needs to be sanded smooth). |
 |
| Finishing up the final coat of bottom paint that first spring we owned Fulmar. Boy that's a lot of jackstands!. We got tired of repositioning them every time we had to get access to the hull under one of the jackstand pads, so we just brought over more stands and raised and lowered the pads on each of them as needed. The yard workers at Portland Yacht Services were very accommodating (Portland, ME in 2016). |
2. Sails & Rigging
New primary winches (for genoa sheets) (2017)
New running backstays (2017)
Refurbished base for mast compression post (2017, inspected & repainted in 2021)
New cabin-top winches (for halyards and staysail sheets) (2018)
New running rigging: mainsail, genoa, staysail, and spinnaker halyards; new genoa furling line; new traveler control lines. (2018)
New stack pack mainsail cover & lazy jack system (2020)
New staysail cover. (2020)
New sun cover on furling genoa (2020)
Stripped paint from mast; treated & refinished. (2021)
New standing rigging (backstay, headstay, inner forestay, cap shrouds, lower shrouds, topping lift) (2021)
New mainsail (2021)*
Tune rigging (2022, 2023)
 |
| Janet fixing one of Damon's screw-ups (No, the lazy jacks don't attach to the spreaders!). |
 |
| Janet and her mom stripping the old sun cover off of the genoa. |
3. Engine & Drivetrain
Fixed glow plugs (2016)
Replaced cutlass bearing* (2018)
Replaced gear box* (2018)
Replaced alternator mounting bracket (after having the old one welded back together twice). (2018)
Fuel tank: remove, clean, inspect, epoxy barrier coat exterior, replace fill hose, rebed/refasten inspection plates, re-secure in place (2021)
Resurfaced face of exhaust flange and tapped new threads for mounting bolts to secure exhaust riser (2021)
Replaced fuel lift pump (2021)
Replaced propeller shaft coupler (2022)
Diagnosed and fixed problem with wiring for main power (2022)
Replaced engine mounts (and modified brackets) (2022)
 |
| The new coupling that connects the propeller shaft to the output shaft of the transmission. It's a bad feeling when you put the engine in gear and nothing seems to happen. |
 |
| The main positive power connection to engine's starter. It was one of the first things we checked when our engine was hesitating to start. This is on the bottom of the starter and, therefore is impossible to see. We use the cameras on our phones to peer into spaces where our heads won't fit, to make it possible to read tiny model numbers engraved on engine parts, and to document how things are supposed look before we dismantle them. |
 |
| One of the new engine mounts. You can see that we had to fill the bolt hole for the old mount with epoxy so that we could reposition the new one in the proper location. |
 |
| Another application of the come-along. This time it was to help us move the engine so that we could align it properly with the propeller shaft. |
4. Deck
New custom bimini (2018)
New solar powered vent fan for chain locker (2018)
Refurbished, painted & re-sealed cockpit coaming boxes (2019)
Refurbished, painted & re-sealed base for engine speed control/gear shift lever (2019)
New custom dodger (2022)
Installed recessed box for engine gauges & controls (2022)
New Davit for hoisting the outboard dinghy motor (2022)
Installed bracket to store the dinghy’s outboard motor on the stern rail (2022).
Replace gasket and dogs that seal & secure the cockpit sole (soon!)
5. Navigation Equipment
New GPS plotter (2017)
New magnetic compass (2018)
New depth sounder & transducer (2018)*
New NMEA 2000 network backbone (2022)
New VHF radio (w/ GPS & DSC) (2022)
New Vesper AIS (w/ GPS) (2022)
New Multifunction Display mounted in a water-tight box (2022)
New Radar (on a new Questus backstay mount) (2022)
New digital compass (2022)
New autopilot (soon!)
 |
| Running cables for the radar, AIS, and GPS antennas. When we replaced the headliner, we made it easy to remove the panels so we could access the space above. That panel to the right is the top of one of the panels. That box to the right of Damon's head is the galvanic isolator that we installed. |
 |
| When we ordered new navigation electronics, we wanted to house the new multifunction display in one of those fancy instrument pods. So we ordered one that would fit our MFD but after 4 months of being told it was on back order, we looked for another solution. It occurred to us that "Hey, we're field biologists. We deploy instruments in the field all of the time and we'd never used a $400 housing for them." There are much more affordable options for keeping electronic gadgets dry. We picked up this weather-proof electronics box for about $30 and had it delivered in 3 days. This shows the front and back of the box, with the B&G multifunction display flush-mounted in the front. |

6. Anchoring & Mooring
New primary anchor (44-lb Spade 100) and anchor rode (75 ft of 7/16” G4 Hi-Test chain and 225’ of 3/4” braided 8-strand plait) (2017)
Made new dock lines (braided 8-strand plait, ⅝ and ¾”) (2017)
Made new fender blankets (2017)
Replaced anchor windlass (Simpson Lawrence Sea Tiger 555) (2021)
New storm anchor (85-lb Mantus M1) and rode (75 ft of 7/16” G4 Hi-Test chain with 250’ of ¾” 3-strand nylon) (2022)
 |
| Our new Sea Tiger 555 manual windlass. We love this work horse. Lots of people say that you must have an electric windlass, but electric windlasses are one of the achilles heels of modern cruising boats. The day we can no longer hoist our anchor with a manual windlass is the day that we should stop cruising and switch to RVing. |
7. Electrical
Fixed reversed polarity in 120-volt AC shore power system (2016)*
Replaced AGM house batteries (4 X 100 Ah) (2016)
Rewired mast (new coaxial cable for VHF antenna, new wires for tricolor light, anchor light, steaming light, foredeck light, and spreader lights) (2016, 2021)
Replaced navigation lights on mast (tricolor, anchor, and steaming lights) (2016)
Replaced deck lights on mast (foredeck and spreader lights) (2016, 2021)
Replaced lead acid engine start battery (twice: 2016, 2022)
Installed a galvanic isolator (2017)
Replaced all cabin lights with LED lights (2017)
Installed new two-bank programmable “smart” battery charger and associated wiring (2018)
2 New solar panels (640 watts, total) mounted on a new, custom fabricated frame* (2022)
2 New Victron solar charge controllers* (2022)
Replaced 4 X 100 Ah AGM house batteries with 2 X 200 Ah lithium (LiFePO4) batteries (2022)
Reconfigured battery restraint systems for both start battery & house batteries (2022)
Replaced external regulator for high-capacity alternator with a programmable regulator (2022)
Installed alternator protection module, alternator temp sensor, and battery temp sensor. (2022)
Replaced main wiring between batteries, engine, alternators, shunt, battery switches, and main breaker panel (2022)
Installed new dedicated buss bar for all navigation electronics (2022)
 |
| The new 2-bank programmable smart charger. Luckily, it came with pre-set charging routines for lithium batteries. So all we had to do was change the charging setting from AGM to LiFePO4 when we installed our new house batteries. |
 |
| Mocking up the solar panels and frame before biting the bullet. |
 |
| Putting the new solar panels on their custom-welded frame. |
 | ||
| Geeking out over the electricity we're producing. The Victron solar charge controllers connect to our phones via bluetooth, so we can monitor the output of the panels and change settings when necessary (which isn't very often). |

 |
| The old regulator for our high-output engine alternator. Our engine has two alternators; one to charge the starting battery (flooded lead acid) and one to charge the house battery bank (LiFePO4). This controls the alternator for our house bank. It was programmable but really wasn't flexible enough to feed and care for our new lithium batteries, which are power hungry but very fussy about how they get fed. The new regulator, a Balmar MC 618, has preset charging programs for this type of battery. |
8. Plumbing
Replaced hoses and fittings for cockpit drains (2016)
Replaced manual bilge pump (2016)
Replaced hoses for side deck drains. (2016, 2018)
Removed manual flush seawater head, holding tank, and associated plumbing. Replaced with a composting head (2018)
Replaced flapper valves & diaphram in manual bilge pump (twice: 2019, 2022)
Replaced macerator pump for galley sink drain and and associated hoses & antisiphon valve (2017, replaced pump again in 2022)
Replaced primary electric bilge pump (800 GPH) (2018)
Replaced high capacity electric bilge pump (2500 GPH) (2018)
Refurbished both potable water tanks (filled & faired tank flanges, repaired blisters in tank lining, painted interior of tanks with food grade epoxy paint, replaced all tank fittings and valves, replaced lids and gaskets, replaced all hoses (fill hose, vent hose, supply hoses to water pumps) (2022)
Replaced all hoses between water tanks, manifolds, pumps, and faucets. (2022)
Installed new manifold to select tanks and pumps. (2022)
Replaced pressure water pump (2022)
Installed new accumulator tank for pressure water system (2022)
Replaced foot pump for galley sink (2022)
Installed new water filtration system with its own faucet (2022)
Replace reverse osmosis watermaker (in progress!)
 |
| The old lid for our aft water tank. You can see it was made of marine plywood that had been coated with epoxy. It lasted quite a while but it was cracked and the wood was rotting (we didn't use this tank for this reason). |
 |
| Janet applying a food-grade epoxy, called "Brew Coat," to the aft water tank. The old screw holes had already been filled, blisters repaired, and an epoxy barrier coat applied (that's the grey coating that she is painting over). |
 |
| After the brew coat dried, we replaced all of the plumbing fittings and filled it water to test for leaks. Once the new lid was installed we didn't want to have to take it back off to fix any leaks. Doesn't this look like a beautiful bathtub? |
 |
| The new Star Board lid. The water from our refurbished tanks is the sweetest! |
9. Galley
Modified lid to ice box/refrigerator to add insulation & gasketing (2016)
Replaced saloon table (2018) (this new table can also be used as a cockpit table)
Raised height of galley counters, installed new Corian countertop, new sink, new manual freshwater faucet, new pressure water faucet, new pressure faucet for filtered water, new teak fiddles around counters, painted fiberglass cabinets and bulkheads, new propane stove/oven (2019)
10. Propane system (for cooking)
Refurbished propane locker (Sealed limber hole in outer locker. Refinished drop-in locker to seal penetrations, fix damage to rim, replaced gasket, replaced lid locking mechanism, replaced vent hose, and re-secured drop-in locker to bulkhead. (2017)
Replaced the entire propane system including: new tanks, regulator, solenoid valve, hoses, gas detectors, alarm, and system control module (2017)
New Force 10 gas range (2019)
11. Safety
New smoke & CO detectors (2017)
New propane gas detectors (2017)
New lifesling (2017) (custom canvas cover made for it in 2021)
New fire extinguishers (2018, 2022)
Replaced lifelines with Dyneema (2020)
Installed lifeline netting (to help keep the doggo onboard) (2020)
New EPIRB (w/ GPS & AIS transmitter) (2022)
Replaced battery in old EPIRB, re-mounted old EPIRB in cockpit locker as a backup. (2022)
12. Other
Bulkhead repair in chain locker (wood bulkhead was delaminating. Cleaned it up and reinforced with epoxy and woven fiberglass). (2018)
Replaced Headliner in quarter berth, v-berth, and head (2018, 2022)
Custom foam mattress and upholstery in quarter berth (2019)
New 6 HP Suzuki outboard for dinghy (2021)
Custom dinghy chaps (2021)
Custom canvas cover for dinghy (2022) (After making both of these custom items the PVC inflatable dinghy began bursting its seams, with no chance of repair. So we purchased a new Zar Mini aluminum-hulled inflatable dinghy with Hypalon tubes. We still use the cover that was made for the previous dinghy but the beautiful chaps had to be discarded.).
.jpg)